LUA Scripting Guide
for Blitzkrieg® Maps
by kaoz MMXI
01. Introduction
This guide is an attempt to make the Lua
Script file, added to a Blitzkrieg map, understandable for mappers. It
is not an explanation of the script language itself. Therefore, all Lua
references are only in relation to a Blitzkrieg map.
This guide will show a lot of examples, but it does not claim to hold
all the answers and/or solutions. Undoubtedly, more experienced scripters
could come up with a thousand more ingenious possibilities, however, for
the beginner, none of these make it easier to understand. The given examples
in this guide, however, will add flavour to a map, because even with a
simple script, the map possibilities are still interesting and providing
more fun to play the map.
Make it easy on yourself and use the program SciTE
to create or open Lua files; not only does
it provide a recognizable icon to your Lua
files, but through the use of different colours, the script simply shows
more lucid. Also included, is a search and replace function that come
in very useful. You can download it here: SciTE
Included in this guide, are also explanations that handle about map making,
rather than Lua, but I consider these essential,
because they are needed to see the complete picture.
I would not have been able to create this without those who created earlier
guides. Therefore, I need to thank hitandrun, [BKP], Wespex, Rémy, Tangram
and Leon. Besides, I studied and learned a lot from other Lua
files, therefore, I would also need to thank Dimitry M., Kristallagent,
CC_Commander, Milknova, Zigfrid and so many others.
Return to index
02. Map Structure
Obviously, there's two important things to create a map: the MapEditor
and a Lua script.
The MapEditor is used to create this map
graphically, to place objects and units, set planes and map tools, create
reinforcements, add start commands and so on. The map is saved as a bzm-file
or xml-file in the folder: Blitzkrieg\Run\data\maps.
In case of a mod, this would be: Blitzkrieg\Run\Mods\MyMod\data\maps.
The Lua-file is used to
create functions, conditions, counters, troop reinforcements and behaviors
for the map that cannot be achieved through the MapEditor.
This Lua-file also needs
to be saved in the folder: Blitzkrieg\Run\data\maps. (Admitted, you could
put this file somewhere else and link to it, but keeping the map-file
and lua-file together
gives you less headaches afterwards).
 |
The Lua-file must be attached to the
map through the MapEditor.
To attach this file, in the MapEditor, press
the Set Script File button and browse to
the specific Lua-file.
 |
A third important thing to finalize the map, is to create a folder
in the Blitzkrieg\Run\data\scenarios\Custom\Missions directory with the
name of the map. In this map are placed the txt-files
for the ingame objectives and one 1.xml-file
that holds map info, map settings and map markers. These files can be
created with the ResEditor, but can also
be copied from an existing map and then changed.
 |
Make sure to save the txt-files in
Unicode format, if not, it will only show
square digits.
Open txt-files and 1.xml-file
from existing maps to learn from it!
Return to index
03. Lua Basic Aknowledgements
Lua scripting allows you to use some powerful
tools that bring action to a map. The main tool being a function,
which will "do" something. Within a function,
you can start another function or set a condition and moreover, various
functions after the condition. This way it is possible to let specific
things happen, accordingly to the player's or AI's behavior and that's
where it becomes very interesting.
Every Lua script needs a initializing function;
the function Init().
Look at it as if it's the ignition of the script: when the map loads in
the game, it will always start reading this (regardless of where this
is placed within the script).
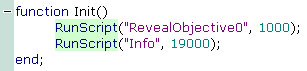 |
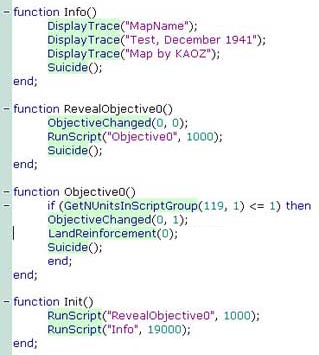
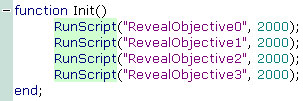
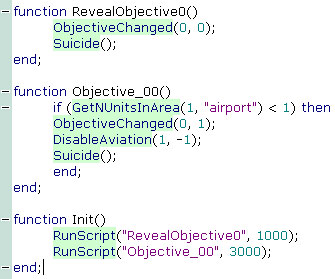
In the above picture, the function Init()
will start the function RevealObjective0
after 1 second. Next, the function Info,
will start after 19 seconds. (1000ms being 1 second). The pre-defined
command RunScript will call the function
only by its title. There are several pre-defined so called keywords
for the Lua language itself and several especially for the Blitzkrieg
engine. The latter are summarized in Calvin's
Lua Scripting Guide (which should always be next to you when you are
map scripting) and we'll deal with most of them in this guide. (I sometimes
refer to these keywords as commands).
Notice that a script-line ends with a ;
(semicolon) and that a function needs to be closed with end;.
Personally, i believe typing a script character by character, is a waste
of time and more vulnerable to typos. Use copy/paste
and simply change the concerning parameters. This doesn't mean you shouldn't
copy without care of course. When a script becomes larger, it's easy to
lose focus. For this same reason, it is better to cluster or group the
script functions logically.
The Lua language is case-sensitive, meaning that it will see a difference
between upper and lower cases. Therefore, writing Function
init() will not work!
Using -- (dashes) allows you to put comments
in a script. Any line preceded with 2 dashes
will be ignored by the engine reading the script. This can also be used
to temporarely switch on or off a certain line.
 |
The example above shows a function with the name DebugView
that is handy when testing your map. Unlike the function
Init(), you can specify the function names yourself, but it is
advised to keep this also logical. If the name shows what it does or wants
to execute, it just makes more sense.
Let's run through the script above:
The function Init() would start the function
DebugView after a second, if it wasn't preceded
by the 2 dashes. This is what i mean by switching on/off a specific line.
Imagine that it did start; it will first set the Password
Panzerklein, which enables other keywords like ShowActiveScripts,
ChangeWarFog and God.
After this, DisplayTrace will show the string
Test123 in the upper left corner of the
game screen. This is used so you get informed whether the script is loaded
and running or not.
Next, the ShowActiveScripts() function shows
the current functions executed by the RunScript()
functions of the script. Again, you get informed in Console mode during
a game whether the specific RunScript is
executed or not.
Next, the ChangeWarFog is set to player
1 (the AI), so in testing mode, you'll be able to see the enemy movements.
Next, God is set to player 0 and to mode
2, in which the player is invulnerable and the opponents are killed at
the first contact. In this example the keyword God
is also disabled by the 2 dashes and will not work. Using God mode can
be handy in the beginning of testing maps, but it is advised to test in
normal mode in later stages also, especially when you need to test balances
in strenght.
Notice that, the function DebugView() uses
the keyword Suicide(). Unlike the function
Init(), all other functions need this to prevent the function from
re-executing itself infinitely.
When a function is made to check a specific condition,
you need to also close this condition with
another end;.
 |
The above function ToLose states that
if the player 0 has less than 5 units, then
a screen message will be displayed and another function Lost
will run after 9 seconds. The if/then is
a condition within the function ToLose.
From the moment this function has started, it will check the keyword GetNUnitsInSide
and proceed once the condition is true, in this case less than 5 units.
But for now, remember that with a condition
you need another end;.
Return to index
04. Setting Map Markers
Okay, imagine you, me or we have created a map with the MapEditor. So
we have a .bzm (or .xml)
file in our maps folder. (Always keep a backup copy in case something
happens...!). Now before starting to script the .lua
file, you will probably have a good idea what the objective(s) of your
map should be like. To describe the objective(s), set map markers for
them and setting up the map for the BK engine to find it, we need the
files in the folder Blitzkrieg\Run\data\scenarios\Custom\Missions\MyNewMap.
 |
You'll see a few txt-files and one
1.xml file.
What is written in the header.txt is what
will appear as a title in the game missions overview, so you want to keep
this short and informative. Long titles make the missions list unreadable.
The description.txt is used to describe
the map's background, obviously. It is however, only shown in the game
when it is part of a chapter. So even there's no real use of it in a single
mission, you should still describe your map as some players might open
and read the file to get a better idea what the map is about.
Same for the subheader.txt: it isn't really
shown in the game, but it is mostly used to write the author's name into
it.
Then there's the objectives: in this example MyNewMap, there's 2 objectives,
being 0.txt and 1txt.
These objectives have both a title or header, being 0h.txt
and 1h.txt.
 |
So, if you need more objectives, keep counting and create 2.txt
- 2h.txt - 3.txt - 3h.txt and so on.
Now, let's take a look to the 1.xml. This
file can be made with the ResEditor, but it's easier to copy one and adapt
it.
In xml-language, you will mainly see tags, like <base></base>.
Some tags are placed inbetween tags and some tags require a reference
to a specific file. Don't worry if you don't understand xml, this is just
how it works, but you should be able to read it and understand which particular
reference you need to change.
Everything between <History></History>
tags isn't really necessary. It only holds information about the path,
time and date, author, etc. when the file was created (through the ResEditor).
You could if you want, change the date and author to your desire.
On the other hand, the tags between <RPG></RPG>
are very important! Let's look at the first part:
 |
So when the game loads, it will load and read this 1.xml
file. The path between the <HeaderText></HeaderText>
tags needs to point to the specific header.txt
file in your mission folder. If, for example, you have copied this 1.xml
and you have a mission folder called Belgium1940,
then you simply change all the MyNewMap's
into Belgium1940.
 |
Okay, let's move on further through the xml:
 |
The <FinalMap></FinalMap>
tags are also very important and refer to the name of your map, being
the .bzm file. The game will look in the
maps folder and search for the name. If, for example, you have a map Ardennes.bzm,
you refer to it in the 1.xml as <FinalMap>Ardennes</FinalMap>.
Next, you can set the music for the map. Some tags, like these, have items.
If, for instance, you want more music, you could add items,
so it would look this:
 |
In case you don't want any music, just leave it empty between the
tags, like <CombatMusics></CombatMusics>.
Or you can also write <CombatMusics/> which
is the same, but shorter than <CombatMusics></CombatMusics>.
It's not of that great importance though.
Next important part of the 1.xml are the
objectives:
 |
So again, you will see reference paths to the txt-files
in your mission folder. Again, change the MyNewMap
into the name of the mission folder.
As you can see, these 2 objectives are items
between the <Objectives></Objectives>
tags. The item Secret can be set to 0
or 1, where 0
will show the objective from the beginning of the game, in contrast to
1, that will keep the objective secret until
you call upon it through the lua script. If you need more objectives,
copy/paste more items and change them.
Now take a good look to the part that says: <PosOnMap
x="96" y="419"/>
These coordinates are used to place the map marker on the minimap for
the objective. In case you don't want any map marker, but still the objective,
simply set their value to zero.
How to find the correct coordinates for your map markers?
These could be set with the ResEditor, but there's an easier way. When
your map is loaded in the MapEditor and in the editor, you would press
the Create button on the bottom left, a
minimap will be created. These files are then created in your Blitzkrieg\Run\data\maps.
There you will find 2 .tga files and some
.dds files. Open MyMap_large.tga
with Photoshop or Gimp.
 |
This large .tga file is always 512 pixels
on 512 pixels, no matter the measures of the actual map. In the picture
above, you see a .tga loaded in Photoshop.
Going over the picture, the mouse pointer will show the exact xy coordinates
in the info panel.
So logically, <PosOnMap x="0" y="0"/>
would be the upper left corner, <PosOnMap x="512"
y="512"/> the bottom right corner and <PosOnMap
x="256" y="256"/> the middle. There is however, a small glitch
as many times I noticed it wasn't shown exact. To solve this, you just
add 8 or 10 pixels to the value and you get a better result. Thus <PosOnMap
x="266" y="266"/> would be the exact middle (shown on the minimap
in the game that is). You will notice this glitch very clear when you
for example want a map marker upon a bridge or a house. In Gimp or Photoshop
you get the exact xy coordinates, but in the game the marker is not exactly
on top of the bridge or house. Like I said, add 8 or 10 pixels and it
will shown correct.
Return to index
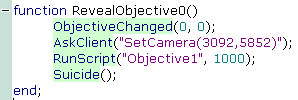
05. Objectives
The following picture shows a basic example with one
objective and one reinforcement.
|
 Let's
"drive" through the script:
Let's
"drive" through the script: In later chapters, we'll go deeper into reinforcements
and ScriptID's. For now, if you were able
to follow and read the script, then you should have gotten a basic idea
of how a Lua script is running. Which is only very logical in fact.
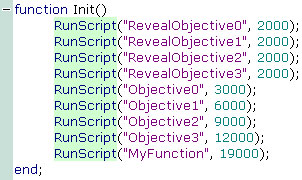
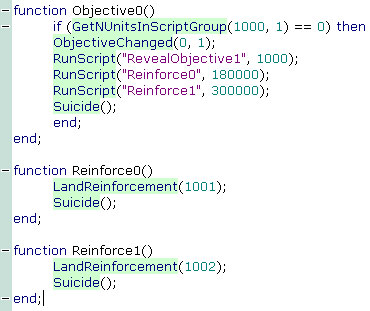
So, let's try more objectives:
|
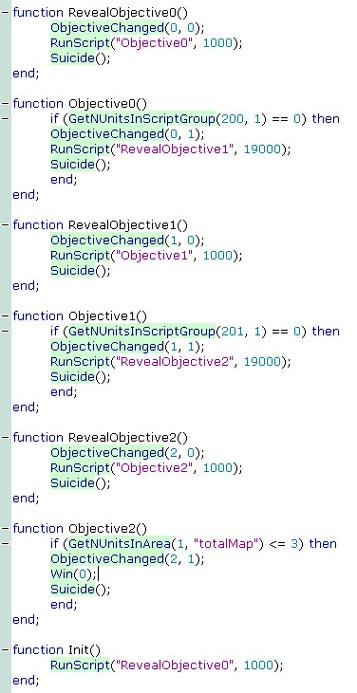 This
script has 3 objectives that follow one another. Setting the secrecy
to the flag (in the
This
script has 3 objectives that follow one another. Setting the secrecy
to the flag (in the Of course, you don't want the player to wait 19 seconds for the
next objective, but it should show that you can play around with timings.
And alternatively, in case you don't want the objectives one after another,
you can start more or all of them at the same time, whenever you like
this to happen.
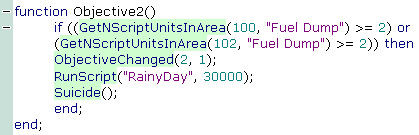
In the following example, when the objective is reached, it will set off
3 other objectives with different time intervals.
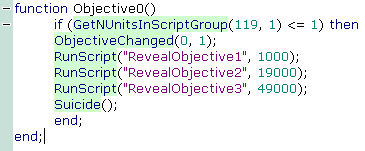 |
In fact, you can start various functions at various time intervals:
 |
At this point, you should start to see the possibilities that you
are able to call any function at a specific time whenever you desire,
in this case, after an objective is reached.
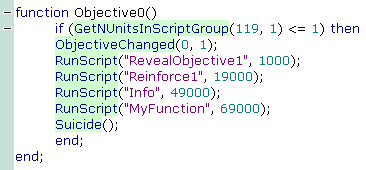
In case you want all objectives at the start, you could also script:
 |
or even:
 |
Do not "overscript" the function
Init() though; if you would script a dozen RunScript's
or more that would start running at the same time, you might ask for trouble.
Avoid script failures and try to set up a logical time schedule.
Return to index
06. Win or Lose
The 2 keywords Win and Loose
of course are of great importance in determining the game's outcome. Determining
when a player should win is mostly very easy, but the Loose
command, imho, is being very underestimated by most mappers. True, some
maps may not need this at all, but personally I think that if the player
has a chance to be beaten by f.e. an AI enemy attack, the game becomes
more challenging.
|
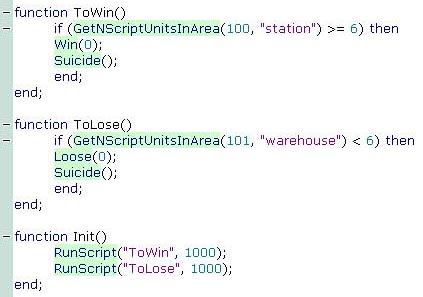 Let's
imagine a map where you have to defend a certain Area and capture
one. Player 0 has units with
Let's
imagine a map where you have to defend a certain Area and capture
one. Player 0 has units with
|
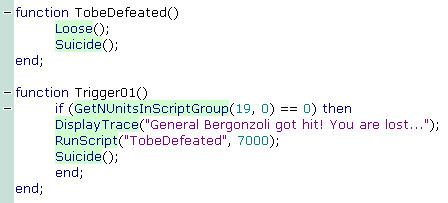 Or
imagine a map where the player will lose if the general of his forces
gets killed.
Or
imagine a map where the player will lose if the general of his forces
gets killed.
|
 Or
in this example, the player will lose if he has less then 5 units
left.
Or
in this example, the player will lose if he has less then 5 units
left. How to create AI enemy attacks and Area's will be explained in
later chapters, but I wanted to focus on Win/Loose
first. Experiment with these to add spice to your scenario.
Return to index
07. ScriptID
Another important thing is the ScriptID.
In the MapEditor you can give any unit, building or object a ScriptID,
which can be referred to in the Lua script.
Double click to open the Properties window of any object. By default,
the value -1 is given by the editor.
 |
There exists a suggestion to use the ScriptID's
as follows:
ScriptIDs 0 - 999 for terrain objects and buildings
ScriptIDs 1000 - 1999 for AI (enemy) units
ScriptIDs 2000 - 2999 for player units
However, this is not a written law, instead it is an advise to maintain
order over chaos.
From the moment you have defined ScriptID's,
you can do remarkable things in the Lua script:
|
 The
The
So, at this point, you should understand that ScriptID's
are a necessary thing in order to be able to let things happen to them.
This will bring action to your map in every way.
Return to index
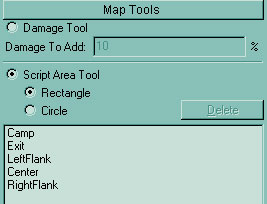
08. Area's
Let's go back to the MapEditor for a moment; on the left side you'll
see the Map Tools panel. With this tool,
you can draw retangular or round Area's
upon the map. Hold the left mouse button and use the keyboard arrows to
enlarge the Area, if needed. When you release
the mouse button, you'll be prompted to set a name for the Area.
Take care, because this is case-sensitive!
Later on in the Lua script, you'll be able
to refer to these Area names.
 |
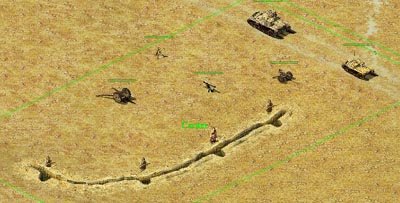 |
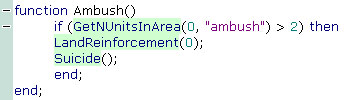
In earlier examples, you have already seen some examples where
an Area was used. It's really handy to create
triggers and thus things will happen from the moment a specific unit or
units come in or leave a certain Area.
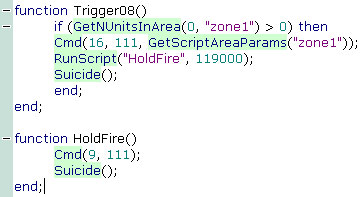
Here are 2 more examples:
|
 The
The
|
 The
The
These examples should give a good idea of what is possible with
Area's in combination with the amount of
units in or out them. There's also a few keywords/commands that return
the number of mines, fences and trenches from a specific Area.
Check out Calvin's
Lua Scripting Guide for this.
Return to index
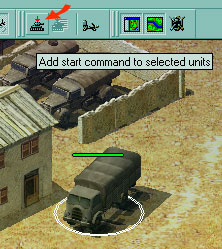
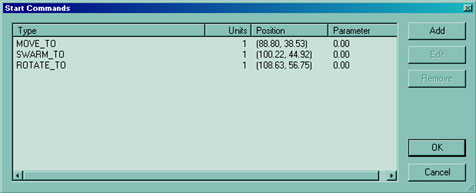
09. Start Commands
In the MapEditor, one can use the Add Start Command
function to command a certain, selected unit or even a group.
Select a unit, click on the icon and the Unit Start
Command Property window will open.
 |
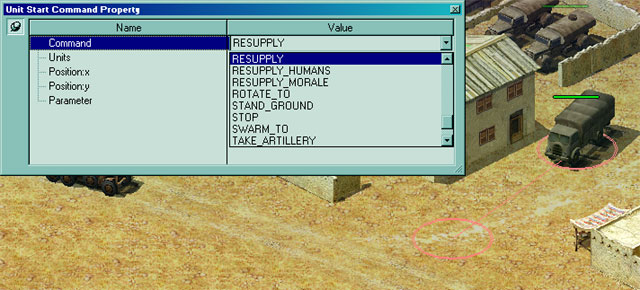 |
From a drop-down list, there's quite some choices of command. Select
one and next, with the window still open, you can click on any spot in
the map to set the x,y positions (notice the pink circle). Or you could
set these manually if you'd like.
You are able to set multiple commands in a row.
 |
Use these commands logically; some commands work only in combination
with a specific unit. Although you can set the command, it might not work.
A tank cannot heal infantry and a truck cannot use a spyglass, and so
forth.
Some of these commands can also be achieved through a Lua
script, but not all and vice versa, there are commands within Lua
that cannot be found in the Add Start Command
from the MapEditor. It demands a little practice to know what is where.
Again, check out Calvin's
Lua Scripting Guide for the possibilities in Lua.
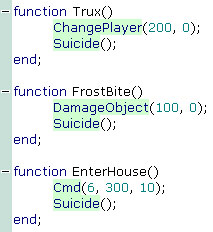
In Lua, the keywords Cmd
and QCmd are used to command specific units.
Pre-defined actions like MOVE_TO, SWARM_TO, CALL_BOMBERS, etc. are used
to specify the command. These actions are connected to numbers, which
can also be used instead. All actions are summorized in Calvin's
Lua Scripting Guide.
Let's show a few examples:
|
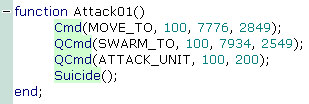 Imagine
you have a tank with
Imagine
you have a tank with
|
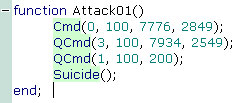 Here,
I have changed the actions with their corresponding numbers, so
this function will do exactly the same as the one in the previous
example.
Here,
I have changed the actions with their corresponding numbers, so
this function will do exactly the same as the one in the previous
example.
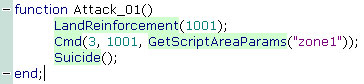
|
 This
example shows a simple function that calls an enemy scout plane
with
This
example shows a simple function that calls an enemy scout plane
with
|
 This
example shows, let's say an infantry unit with
This
example shows, let's say an infantry unit with All these commands can be set for the AI enemy, but also for the player.
However, a player can chose to select the specific unit and change its
purpose; in that case, any given command will get cancelled. It may also
happen that you command a plane and then it suddenly starts to rain, cancelling
any given commands to it.
At this point, you should have a serious idea of command possibilities.
Again, these will bring action to your map. Beware although and always
test your given commands. In a lot of cases, the given commands might
react in the game different as expected. If you, for example, connect
a trigger to a certain action and when the action gets blocked or cancelled
in some way in the game, your trigger will also not work anymore. The
more complicated you make this, the more testing it will need, from various
points of view.
Return to index
10. Reinforcements
Let's return again to the MapEditor, where on the left side, you'll notice
the Reinforcement Groups panel.
|
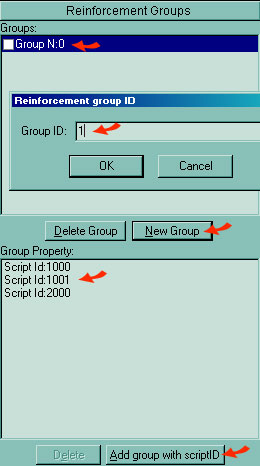 First,
click on
First,
click on We've seen the command earlier in an example, but here's a few
more:
|
 When
When
|
 In
case you want to have more control over the timing of your reinforcements,
it's better to put the
In
case you want to have more control over the timing of your reinforcements,
it's better to put the There is one thing you need to pay attention to, when you combine
actions to reinforcements. Reinforcements do take some time to take place.
If a group of tanks would land, they'll do this in an unpredictable way,
one by one. It will not land all the tanks at the same time.
Have a look to the following function:
|
 This
function makes perfect sense, but will perform poorly in the game.
So, imagine that group of tanks with
This
function makes perfect sense, but will perform poorly in the game.
So, imagine that group of tanks with
|
 One
way to solve this, is using the
One
way to solve this, is using the Well, that's pretty much it concerning reinforcements. There is
still the keyword DeleteReinforcement(),
which you obviously, can use to remove reinforcements with GroupID
x.
Return to index
11. Aviation
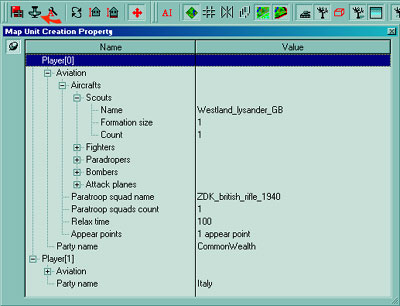
Aviation works a bit the same like reinforcements. Back again, in the
MapEditor, pressing the little plane icon in the menu, will enable you
to set plane types, appear points and such. You ought to do this before
anything else, I think btw.
|
Once that is set, you have a little more options to "control"
the aviation through Lua: some Lua
script commands let you play with their appearance and behavior.
|
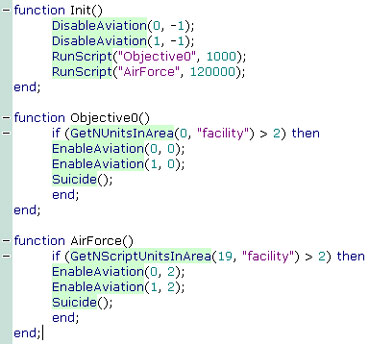 In
this script, the
In
this script, the
|
 In
this next example, both parties start with no aviation.
In
this next example, both parties start with no aviation.
|
 I've
used this one in maps where the player has to conquer an enemy airfield.
It would only be logical that from that moment, enemy aviation becomes
disabled.
I've
used this one in maps where the player has to conquer an enemy airfield.
It would only be logical that from that moment, enemy aviation becomes
disabled.Return to index
12. Weather
Setting the weather is really easy in Lua,
and especially handy when you need good weather to call (enemy) planes
or when you need rain in case you surely don't want any aviation to happen
(for a specific time).
|
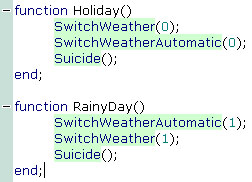 I
often use these 2 functions because they give me exactly what I
need.
I
often use these 2 functions because they give me exactly what I
need.This works fine for me, but you could change it any way you want.
Return to index
13. Variables
In Lua (as in other script languages),
you can assign a decimal, an integer or a string value to a global
or local variable. Using a function, you
can then check whether it's value corresponds to a certain condition or
not. And this can be extremely handy!
Global means that this variable is set,
covering the whole script. Local means that
the variable is set and covering a part of the script. I can't explain
variables fully detailed here, because I don't consider myself such a
great scripter and so this task isn't up to me really. However, I hope
the following examples may show some of the possibilities.
|
 In
this script example, each time an objective is reached, a
In
this script example, each time an objective is reached, a
|
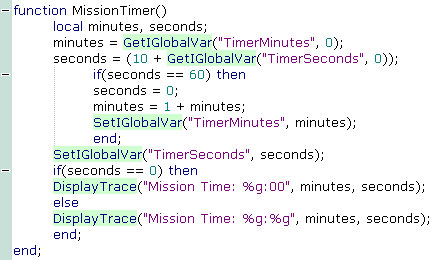
 In
this example, the variable is being used as a counter.
In
this example, the variable is being used as a counter.Return to index
14. A Few More Tricks
In this final chapter, you'll find a few examples of more complex situations
or goals, achievable through Lua. These
were not invented by myself, but I have adapted them and I often use them
when a particular situation asks for them.
|
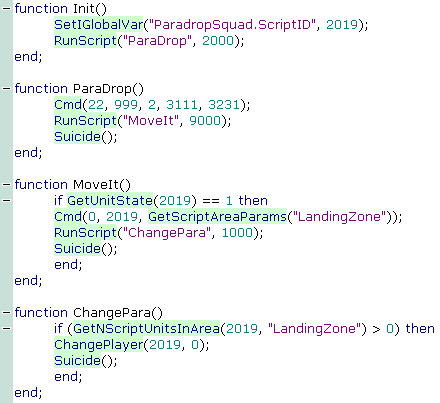 This
script shows how to use a
This
script shows how to use a
|
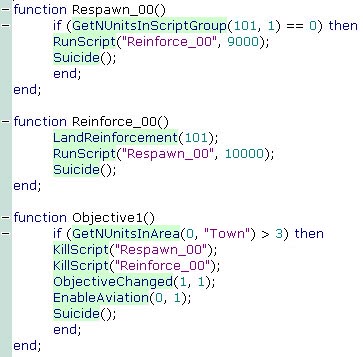 This
script is again, not complete, but imagine the functions are running.
This
script is again, not complete, but imagine the functions are running.
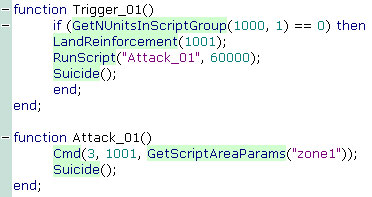
|
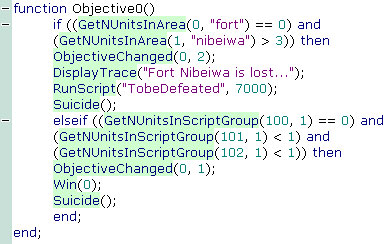 In this scenario, we have a fort that needs to be defended by the
player, while the AI enemy is attacking with a group of units with
In this scenario, we have a fort that needs to be defended by the
player, while the AI enemy is attacking with a group of units with
|
 This
This
|
 The keyword
 Return to index
created by kaoz - MMXI